
In Mac OS X, the terms “ejecting” and “unmounting”, as they relate to removeable media, are considered interchangeable by most end users. Most people will talk about “ejecting” their USB flash drive, even though this doesn’t cause the drive to pop out like a CD or DVD. Apple explain this thus:
Ejecting a volume may not mean that it is physically ejected from the computer, but that it is no longer available (mounted) on the desktop or in a Finder window.
There is a wide array of devices that can be attached to Mac OS X – floppy drives, zip drives, firewire and USB hard drives, DVDs, CDs, iPods and other MP3 players, flash drives, cameras, and memory cards. 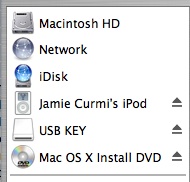 When devices are attached, they appear in the Finder – on the Desktop, and in Finder windows in the side bar.
Drives can be ejected in a number of ways too. You can press the “eject” icon next to a mounted drive in a Finder window, you can drag a volume to the Trash (which will change its icon to show an Eject symbol as you start the drag), and if you are ejecting an actual CD/DVD, you can just press the eject key on the keyboard.
At this point, with all these methods, why on earth would I be writing about improving ejection of removable media on OS X?
Saving to a flash drive
My wife has to use Windows at work. So she’s used to the Windows way of doing things. At home we don’t have any Windows machines, so she uses my Mac, and she doesn’t generally have a problem.
A short time back she came to me with a flash drive and asked me if she could save something a friend sent her in email to the drive. I said “of course”, and set about explaining to her how to do this.
I plugged in the flash drive, and started Mail. We found the mail item with the file attached and I said to her “Ok, we can use Exposé. We drag the attachment, and press F11, then drop it on the drive…”.
At this point, Kaoru asks me “Can you show me a ‘normal’ way to do this?”. Normal? Ok, what she meant was something a little more like you’d do on Windows. I thought for a second, and then said “Yep!”.
Back to the mail item, I clicked on the “Save” button on the mail item, next to the Attachments label. It brought up a save dialog, I chose the USB flash drive, and clicked “Save“. I laughed a little, as it was probably faster than the Exposé method I was going to use – I’m just so used to using drag and drop for everything.

At this point Kaoru asks for her flash drive back. “Ok, we have to eject it”, I said. “To do that we use Exposé to go to…”.
Ok, so here’s the issue. Without switching to the Desktop, or a Finder window, how do you eject removable media?1
Ejecting without the Finder
On Windows, when you plug in removable media, there is a little icon in the bottom right of the start bar that you click. It brings up a dialog, and from that you can eject the media. It’s not pleasant as you have to read a lot of text and press a few buttons on a couple of dialogs, but at the same time, it isn’t too pleasant having to switch over to the Finder or Desktop to eject media.
Now, OS X actually comes with an Eject Menu Extra. I hadn’t played with that for a long time, so I set about installing it. For those who don’t know, a Menu Extra is a little icon that appears in the right hand side of the Apple bar – like Volume and the Clock in OS X. This seemed like the solution we needed – it would be like Windows, though quicker to use as you just choose the drive from the list and it ejects.
To find this menu extra, go to the root of your hard drive and open System/Library/CoreServices/Menu Extras. Inside that window, double-click on the icon labelled Eject.menu.
In your menu bar you’ll now find the new Eject icon.

But there is a problem. This menu extra only works for CD and DVD drives! The USB flash drive, iPods, hard drives etc. don’t appear in the drop down menu.

This is a good solution if you have more than one CD/DVD drive. But it isn’t a solution for our needs.
A third party to the rescue
My next thought was to build my own eject menu item. But I figured I couldn’t be the only one who’d seen this shortcoming – someone must have built one already. And yes, it turns out they have.
I soon found Ejector. Ejector gives you an eject menu, and displays all ejectable media. One click, and the media is ejected.
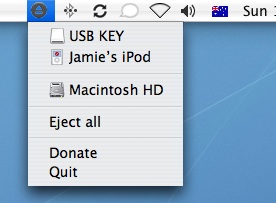
It does have a few issues – the icon is a little ugly (you could replace it with the one from Apple’s Eject Menu Extra), and it lists your startup drive as an ejectable volume, which it isn’t. But overall, it does the job.
One more try
I did have another thought though. What if I put the /Volumes folder in the Dock. Then I could right click on that, then right click on a Volume and choose “Eject“. No need for a Finder window to pop up.
Unfortunately though, objects in dock popups from a folder are not real objects. They do not allow context menu clicks – they act as left clicks, opening a Finder window. So this doesn’t work either.2
What can Apple do to improve here
There are two possible solutions I can see here. Either Apple updates the Eject Menu Extra to work with all volumes, not just CD/DVD drives, or Apple creates an additional ejection method along the following lines.
If the only ejectable volume on your Mac is an inserted CD/DVD, and you press the Eject button on your keyboard, the CD/DVD should eject as it currently does.
If you have other media however, OS X should pop up a dialog. A simple dialog, perhaps even a cool dark translucent window like changing volume, that shows the other items that could be ejected. Pressing the eject button again would eject the CD/DVD drive – since that is probably the default mechanism for most users. However, clicking on the icon of one of the other volumes in this dialog would eject that volume.
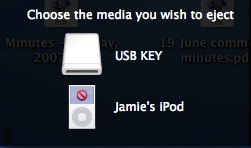
In doing this, the menu bar wouldn’t get cluttered with yet another icon, and the eject button would still maintain the function you’d expect – “ejecting”.
Further, ejecting media would be a very simple process, not requiring switching applications. Simple and clean.
Something for developers
I did actually play around with some code in Objective-C and AppleScript to see how you find and list removable media. The results might be interesting for developers – I’ll write another article on that soon.
1 A friend did point out one way. You could go to “save” again in Mail, and from the side bar of the save dialog, press the eject button. This will work, but is perhaps a bit unintuitive, and is certainly an ugly hack solution.
2 I’ve been told that Stacks in Leopard also do not contain real objects, so you can’t get context menus on these items either. So this solution won’t work in Leopard. I can’t confirm this, as I don’t have Leopard, but I believe my sources are accurate.
Now if only there was software that would hear the pushing of the eject button on external optical drives and tell OS X to eject the disc…
Or, Apple could just do what Windows already does, and just let you remove the damn thing without jumping through a bunch of hoops in the first place.
The reason she didn’t know about “ejecting” a volume was that Windows doesn’t use that antequated idea. Removable media is just that – hot swappable and *removable*.
Actually Jayson, this isn’t true. In windows, if you stick in a USB thumb drive, you have to click on a little icon in the bottom right of the start bar to eject it before you take it out again.
Actually curmy, I’ve been hot swapping my USB thumb drives in Windows XP and Vista for years. I’ve never used that “safely remove hardware” icon and I’ve never had a problem. I just started using OSX and I wonder if I’m going to screw something up now if I don’t eject my USB flash drives. Why do I have to anyway if it’s not being written to or read from?
There are 2 reasons why this exists, both on Windows and OS X. First, some drives cache writes to the disk, so it doesn’t actually do the full write until a bit later – which can make access to files faster etc. If you pull out the drive directly, you could end up with a corrupt file if it hasn’t finished doing all the writes. The second reason is that a program may be accessing that device in some way – maybe even a hidden program, say Spotlight or whatever Windows has that is similar. By ejecting or removing it safely, the OS will check that there isn’t something accessing the disk.
Ron, if you’re new to OS X, you might not know that if you delete something on your thumb drive, it goes to a special trash on your thumb drive. If you just eject the drive, the file is still in existence on your USB drive. Next time you put the drive in, it will be in the trash can. If you pull the drive out, it will no longer be in the trash can that you see in the Dock. I mention this because I’ve found lots of new Mac users get confused by this behaviour (no idea what Windows does in these cases).
So far, I hate my Mac.
It just isn’t possible that something this damn simple is this ridiculous. I have two complete manuals and nothing that will tell me how I know when it’s safe to disconnect my flash drive. Windows has Mac beat hands down on this one. What a disappointment. I’m miserable. I have no choice but to pull this thing out and pray I’ve “ejected” it properly and I don’t lose months of work that are held on this flash drive. With windows, you right clicked the icon, you clicked the “remove” statement, and then the light on the flash drive goes off and a bubble in windows tells you it’s safe to remove. I ejected the flash on this stupid macintosh, but the light is still on. AND THERE IS NO WAY TO FIND THE STUPID THING AGAIN. THE ICON HAS DISAPPEARED. THERE’S NO COMPUTER FOLDER THAT SHOWS THE DRIVE. IT’S JUST GONE. I HATE THIS COMPUTER!!!!!!!!!!!!!!!!!!!!!!!!!
Whoa there Jean.
It is really simple on the Mac. When you put the flash drive in, it appears as a drive. It will be on your desktop, and in any Finder window you open.
To eject it safely, you drag it to the trash (which turns in to an eject icon), or click the eject icon next to the drive in the left hand side of the finder.
When it is no longer there, you pull it out. That’s pretty simple.
Ignore that the light is still on. That just shows there is power to the drive. It is no longer on the desktop or the finder as you’ve seen (“THE ICON HAS DISAPPEARED”). That means you can eject it.
Because it doesn’t work the same as Windows doesn’t mean it is wrong or worse than Windows. It means it is different. You need to learn those differences, not complain that it doesn’t work like Windows. Windows is definitely not better in this regard.
I find it annoying that my eject button doesn’t work on DVDs if DVD player is running… Mac assumes that it’s in use, which is technically true… but a DVD is read-only so no danger of corrupting anything, and I’m not accidentally pushing that eject button, so why must I find my DVD player controller and choose eject from there?
I know, compared to world hunger this is a small thing, but still…
You can do it via a command line — and using Quicksilver and its Triggers, tie that command line to a hot key.
diskTool -e disk2
is what I need to run to eject my usb HD. Use -l to list the attached drives:
diskTool -l
You’ll probably see quite a few listings, pluck out what is needed for your setup. You can also remount the usb HD using that same tool with a different switch:
diskTool -m disk2
But it doesn’t show up until we refresh things:
diskTool -r
So, to eject:
diskTool -e disk2
To remount:
diskTool -m disk2
diskTool -r
You can create applescripts out of those if you like, so you can tie it into Quicksilver triggers easily:
Eject:
do shell script “diskTool -e disk2”
Mount:
do shell script “diskTool -m disk2”
do shell script “diskTool -r”
I bind the eject script to Option-E and mount script to Option-M. It’s not the quickest, but it lets me connect/disconnect drives with a simple keystroke, regardless of which app I’m in.
@ Jean:
I’m a Windows developer turned Mac guy, so I completely understand your point of view. What tripped me up at first with my Mac was the lack of notifications that things worked — like the bubble popping up saying the drive was disconnected, for instance.
My first gotcha was with printers. I hooked mine up, got no notifications whatsoever. I assumed it wasn’t even detecting it, so I googled for awhile. Found nothing. Decided to try to print anyway — everything worked, first try.
The mental context switch you have to make is this:
In Windows, you assume something fails unless it explicitly tells you it worked. Like the bubble popup you mentioned.
In Mac, you assume something works unless it explicitly tells you it failed.
Once I realized this, my Mac experience improved greatly and I began to see some of the shortcomings of Windows that I didn’t even know were there. Don’t get me wrong, Mac has its shortcomings as well — Finder stinks. Period.
But overall, if you let your Windows habits and mind frame fall away, you’ll enjoy your Mac much more :)
Device /dev/disk1s1 is getting automounted on /Volumes/UNTITLED.
i want to mount the device again on different path like /Volumes/temp.
so that i can have same device mounted at two different place.
When i type ” mount /dev/disk1s1 /Volumes/temp” in Terminal , i get the following message : /dev/disk1s1 on /Volumes/temp: Resource busy
Can anyone help me in this?
Why do you want to do this? Why not just mount it as /Volumes/temp. I.e., in the Finder, click on the title of the disk, and change UNTITLED to temp.
Or make an alias to it, and call it temp. Or a link from the terminal (ln -s).
I would like to share my experience. I ejected my thumb drive using the eject button on finder. The thumb drive icon on my desktop disappeared. However it still showed in my finder plus the light on the thumb drive is still flashing.
After 20 minutes, I surf for solutions. As advised by curmi to ignore that the light is still on, I pulled out the thumb drive. A warning message came out saying that the disk was not removed properly and data could be lost. I put the drive back in and click ok. The light flashed a few times and then stopped.
I waited a few minutes and pulled it out. (Note: there’s no thumb drive icon on the desktop). The warning message came out again, I put it back again. The light flashed on a few times and then stopped.
I checked out the finder and clicked on the thumb drive icon at the sidebar. The desktop showed the icon as well. So I drag the icon to the trash, and this time I managed to remove the thumb drive safely. When I checked the data, all seems ok.
I think it is better to eject by dragging the thumb drive icon to the trash rather than using the eject button on the finder’s thumb drive icon.