
Trac is an issue tracking system for software development projects. It integrates with Subversion (SVN), and is considered one of the better issue trackers out there because it is light weight and doesn’t bog down issue tracking with huge numbers of options that confuse the user.
Getting Trac running on OS X Leopard Server is quite simple, though it does require some use of the Terminal application. The following is a tutorial on installing Trac, with an emphasis on doing so in the most OS X way possible, and integrating with Open Directory for authentication (the standard user authentication method used by Leopard Server).
This tutorial is made easier if you follow the instructions here on setting up SVN on Leopard Server. I will in particular make use of the sections on “Using Server Admin” and the section immediately following on “Back to the Terminal”.
Installing Trac
From Safari on your Leopard Server, download the latest version of Trac (at the time of writing, this was version 0.11.1).
If downloaded from Safari, this would normally download the zip file to the Downloads directory, and unzip it automatically. If not, unzip it manually. Then follow these commands:
cd ~/Downloads/Trac-0.11.1
sudo python ./setup.py install
Enter your admin password, and allow Trac to install.
Setting up the Environment
Making folder choices that are OS X-style, create an area for your Trac Environments. The location I choose is /Library/Trac/Environments. From the Terminal type:
sudo mkdir -p /Library/Trac/Environments
The next step is to create an environment for your development project. Because the folder name used here will be part of a URL, and URL components tend to be lowercase, I choose to use a lowercase name for the environment. Suppose we have a project “My Project”. For this project, I create an environment as follows:
sudo trac-admin \
/Library/Trac/Environments/myproject initenv
You will be asked a number of questions. For most you can take the default, but you may want to change the name, and you should enter the correct location for your subversion repository. In the example above, the interaction looks something like the following:
Trac will first ask a few questions about your environment
in order to initialize and prepare the project database.Please enter the name of your project.
This name will be used in page titles and descriptions.Project Name [My Project]>
Please specify the connection string for the database to use.
By default, a local SQLite database is created in the environment
directory. It is also possible to use an already existing
PostgreSQL database (check the Trac documentation for the exact
connection string syntax).Database connection string [sqlite:db/trac.db]>
Please specify the type of version control system,
By default, it will be svn.If you don’t want to use Trac with version control integration,
choose the default here and don’t specify a repository directory.
in the next question.Repository type [svn]>
Please specify the absolute path to the version control
repository, or leave it blank to use Trac without a repository.
You can also set the repository location later.Path to repository [/path/to/repos]>
Creating and Initializing Project
….
Congratulations!
Now, change the owner of the Trac area:
sudo chown -R www:admin /Library/Trac
And set up Trac administration:
sudo trac-admin /Library/Trac/Environments/myproject
This will bring you to a prompt along the lines of:
Welcome to trac-admin 0.11.1
Interactive Trac administration console.
Copyright (c) 2003-2008 Edgewall SoftwareType: ‘?’ or ‘help’ for help on commands.
Trac [/Library/Trac/Environments/myproject]>
At this prompt type:
permission add authenticated TRAC_ADMIN
Then type:
quit
Make sure these two commands are applied from with trac-admin, not directly at the Terminal command-line.
Using Server Admin
Start up Server Admin on Leopard Server, and go to the Web section. Click on Sites at the top of the Server Admin screen. In following my SVN setup instructions, you should have a site set up on port 443. We will use this site, so select this site from the list.
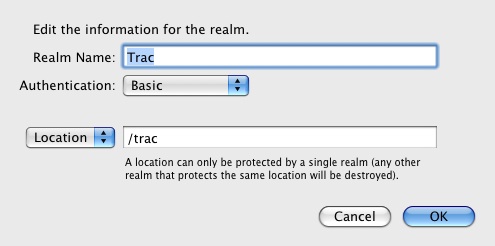
Choose the Realms Tab, and create a new Realm for Trac by choosing the + button under the list of Realms (Subversion should already be listed). Enter information as shown.
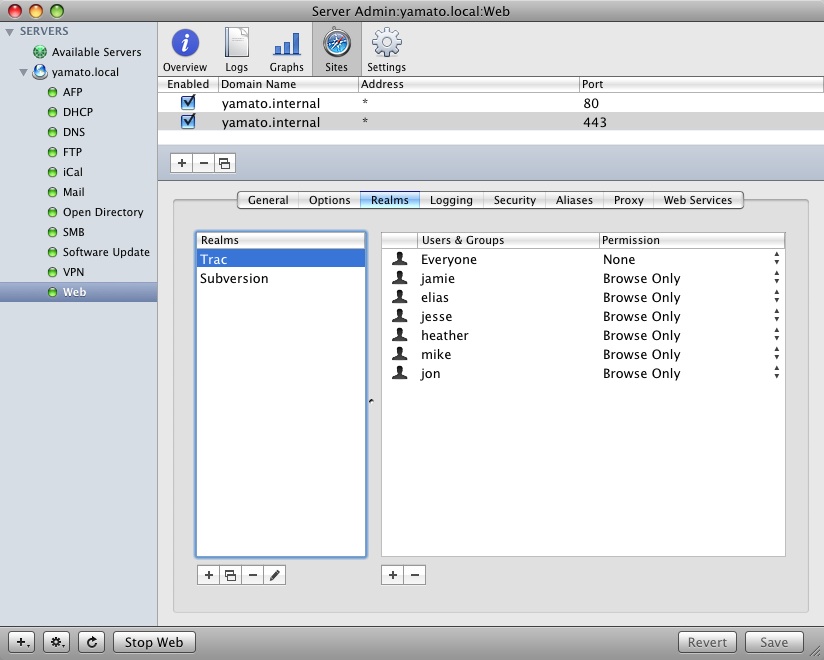
Once created, the Realms tab should look as follows. Add users to the Realm as required – note that they only need to be listed as having Browse Only permissions.
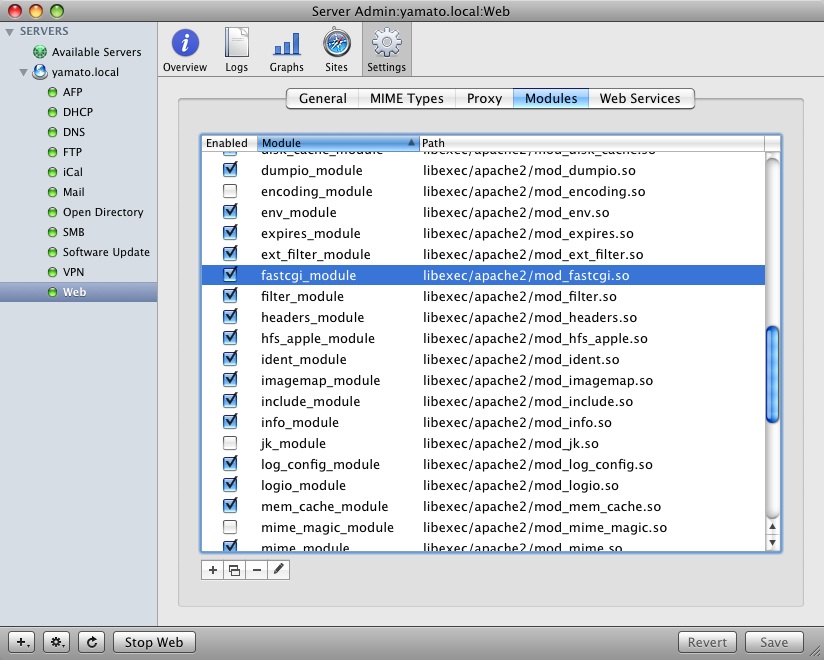
Go to the Settings at the top of the Web administration page, and choose Modules. Find the “fast_cgi” module and turn this on as shown.
Save all changes.
Back to the Terminal
In Terminal, go to the directory /etc/apache2/sites. If you followed the subversion setup instructions, you will be able to go to the sub-directory “0001_any_443_yamato.internal” (or whatever your directory was called) and add a Trac configuration file.
cd /etc/apache2/sites/0001_any_443_yamato.internal
sudo vi httpd_trac.conf
In this file place the text:
ScriptAlias /trac
/System/Library/Frameworks/Python.framework/Versions/

Current/share/trac/cgi-bin/trac.fcgi
All on one line. Note that the last two lines should be joined without a space, but there should be a space after “/trac“.
NOTE that Apple have made changes to Python in later releases of Leopard Server. These changes result in the install NOT installing trac.fcgi to the /System/Library area. This makes sense – it was wrong for the installer to have installed in to the /System area, rather than the /Library area. But unfortunately, this breaks things. First, the installer doesn’t install the cgi-bin directory anywhere, and even if you copy it manually to /Library for example, it doesn’t seem to run.
I have found it only runs if it is in the /System/Library area as described in the ScriptAlias line above. So, if you find that your installation doesn’t work following all the instructions in this article, try copying the cgi-bin directory (from your original install) to /System/Library/Frameworks/Python.framework/Versions/, making directories as required.
Current/share/trac/
Now set up Fast CGI:
cd /etc/apache2/sites
vi global.conf
In that file place the text:
FastCgiConfig -initial-env
TRAC_ENV_PARENT_DIR=/Library/Trac/Environments
All on one line.
Back to Server Admin
Restart the web server, by clicking Stop Web and then Start Web.
You should now have a working Trac installation, linked to your project’s subversion repository, and using Open Directory for authentication of users. You should also be able to add and remove people from the Trac Realm at will, without having to mess with the configuration files.
In my example, Trac is available from the web link https://yamato.internal/trac.
Further Configuration
If you want to further configure your Trac environment, you can edit the file /Library/Trac/Environments/cdms/conf/trac.ini and make any changes.
Thanks Jamie, great tutorial. I’ve been able to get SVN working fine, but cannot get Trac working. It will happily run using tracd, but I cannot get it working with Apache. The issue seems to be locating the trac.fcgi file. The path you’ve given above (/System/Library…..) seems to generate an error for me that the script cannot be found or unable to stat. I’ve tried referencing the file found in the Trac installation folder (i.e. what I downloaded) and the file is found, but then I have problems with it not being able to run reliably. Any suggestions would be very welcome!
Note that the article has now been updated to fix a problem that occurs in later releases of Leopard Server and Python. The work around may not be required in the future with future versions of trac, but seems to work for current versions.
Thanks Paul for letting me know about the problem, and letting me work out what the issue was with your system so that I could find a solution.
Man, MANY thanks for posting this. In addition to the cgi-bin error, I also encountered another item, which is covered here: http://trac.edgewall.org/wiki/TracOnLeopardServer#a10.5.3underApachetroubleshooting:
The .python-eggs directory needs to be present in your /Library/WebServer and it needs to be owned by apache.
Oops. That colon is supposed to be part of the URL, apparently.
Thank you for the instructions!
As per version 0.11.3, manually installing trac.fcgi in /Library/Trac/cgi-bin (and setting proper permissions) works, so no need to fiddle with /System/Library/… anymore!